الخميس، 23 يونيو 2011

Super FileUpload


c# code
-------------
using System;
using System.Collections.Generic;
using System.Linq;
using System.Web;
using System.Web.UI;
using System.Web.UI.WebControls;
using System.IO;

public partial class _Default : System.Web.UI.Page
{
    protected void btnAdd_Click(object sender, EventArgs e)
    {
        if (upImage.HasFile)
        {
            if (CheckFileType(upImage.FileName))
            {
                String filePath = "~/UploadImages/" + upImage.FileName;
                upImage.SaveAs(MapPath(filePath));
            }
        }
    }
    bool CheckFileType(string fileName)
    {
        string ext = Path.GetExtension(fileName);
        switch (ext.ToLower())
        {
            case ".gif":
                return true;
            case ".png":
                return true;
            case ".jpg":
                return true;
            case ".jpeg":
                return true;
            default:
                return false;
        }
    }
    void Page_PreRender()
    {
        string upFolder = MapPath("~/UploadImages/");
        DirectoryInfo dir = new DirectoryInfo(upFolder);
        dlstImages.DataSource = dir.GetFiles();
        dlstImages.DataBind();
    }

}

Design


at the end you need to create folder in Application root called "UploadImages"  to store images on it.

السبت، 18 يونيو 2011

AdRotator using datareader

using System;
using System.Collections.Generic;
using System.Linq;
using System.Web;
using System.Web.UI;
using System.Web.UI.WebControls;
using System.Data.SqlClient;
using System.Data;

public partial class _Default : System.Web.UI.Page
{
    protected void Page_Load(object sender, EventArgs e)
    {
        if (!Page.IsPostBack)
        {
            FILL_ROTATOR();
        }
    }

    private void FILL_ROTATOR()
    {
        
        SqlConnection conn = new SqlConnection(@"Data Source=.\SQLEXPRESS;AttachDbFilename=C:\Users\ahmed\Downloads\websiteRami\websiteRami\rami.mdf;Integrated Security=True;Connect Timeout=30;User Instance=True");
        SqlCommand cmd = new SqlCommand();
        cmd.Connection = conn;
        cmd.CommandText = "SELECT * FROM Advertisements";


        SqlDataAdapter adp = new SqlDataAdapter(cmd);
        DataTable dt = new DataTable();
        adp.Fill(dt);

        AdRotator1.DataSource = dt;
        AdRotator1.ImageUrlField = "ImageUrl";
        AdRotator1.NavigateUrlField = "NavigateUrl";

        AdRotator1.DataBind();
    }
}


------------
CREATE TABLE Advertisements(  
    AdID int NOT NULL,  
    ImageUrl varchar(255) NOT NULL,  
    NavigateUrl varchar(255) NULL,  
    AlternateText varchar(255) NULL,  
    Keyword varchar(255) NULL,  
    Impressions int NULL  
)

الاثنين، 13 يونيو 2011

حمل وشاهد الحلقة السابعة والثامنة من سلسلة ال asp.net 2010 بالغة العربية

الثلاثاء، 7 يونيو 2011

Nested ASP.NET Repeater

Steps
1.   Drag and drop to repeater control and add ItemTemplate inside the repeater.

2.   The element for the first Repeater control begins with an HTML table row () that includes a Label control. The Text attribute for the label uses the Eval method to display the name field from the data source.

3.   Next, the item template includes a Repeater control that displays the topics for the current forum. Like the first Repeater control, the data binding for this Repeater control is handled in the codebehind file.

The item template for the second Repeater control displays an HTML table row for each topic associated with the current forum. A LinkButton control is used to display the topic name. The PostBackUrl address for the link button uses the Eval method to pass the ID for the selected topic to the Threads.aspx page as a query string. For example, if the user clicks the link button for a topic whose topicid is 4, the PostBackUrl will be Threads.aspx?topic=4.


The code-behind file for the Forum Home page


public partial class _Default : System.Web.UI.Page
{
    DataSet ds;
    protected void Page_Load(object sender, EventArgs e)
    {

        SqlConnection con = new SqlConnection(WebConfigurationManager.ConnectionStrings["ForumConnectionString"].ConnectionString);       
        ds = new DataSet();
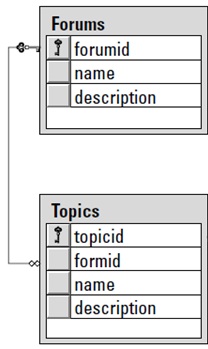
        // fill the Forums table
        string sel = "SELECT [forumid], [name] " + "FROM Forums " + "ORDER BY [name]";
        SqlDataAdapter da = new SqlDataAdapter(sel, con);
        da.Fill(ds, "Forums");

        // fill the Topics table
        sel = "SELECT [forumid], [topicid],[name], [description] FROM Topics ORDER BY [name]";
        da = new SqlDataAdapter(sel, con);
        da.Fill(ds, "Topics");
        // bind the Forum repeater
        ForumRepeater.DataSource = ds.Tables["Forums"].DefaultView;
        ForumRepeater.DataBind();
    }


protected void ForumRepeater_ItemDataBound(object sender, RepeaterItemEventArgs e)
    {
        //FindControl method to find the Repeater control named TopicRepeater
        Repeater r = ((Repeater)e.Item.FindControl("TopicRepeater"));

        //e.Item.DataItem is used to retrieve a DataRowView object
        //that lets you access the individual data fields for the Repeater item.

        DataRowView drv = (DataRowView)e.Item.DataItem;
        string forumid = drv["forumid"].ToString();
       
        //retrieve a DataView object for the Topics table of
        //the data set and set its row filter so it views only those rows
        //whose forumid field matches the value of the forumid variable 
        DataView dv = ds.Tables["Topics"].DefaultView;
        dv.RowFilter = "forumid=" + forumid;
        r.DataSource = dv;
        r.DataBind();
    }
}


الاثنين، 6 يونيو 2011

WPF Routed events

Routed events are events that are designed to work well with a tree of elements. When a routed event is raised, it can travel up or down the visual and logical tree, getting raised on each element in a simple and consistent fashion, without the need for any custom code.


Routed events are a new infrastructure provided by WPF which allows events to tunnel down the visual tree to the target element, or bubble up to the root element.  When an event is raised, it “travels” up or down the visual tree invoking handlers for that event on any element subscribed to that event it encounters en route.  Note that this tree traversal does not cover the entire visual tree, only the ancestral element chain between the root element and the element which is the target of the event.
It is common that one logical routed event is represented by two actual events, one tunneling and one bubbling.  The naming convention for tunneling events is PreviewXYZ, where XYZ is the name of the bubbling event.  For example, PreviewMouseLeftButtonDown and MouseLeftButtonDown are a pair of routed events used to notify elements in the visual tree that the user has depressed the left mouse button.  Not all routed events have a tunneling event, and some events do not tunnel or bubble at all.  Those are referred to as directevents, and they are essentially the same as standard CLR events.


Benefits
1.       One very important benefit of routed events is that a high-level visual element in a UI need not explicitly hook the same event on all of its descendants, such as MouseMove.  Instead it can hook the event on itself, and when the mouse moves over one of its descendants, the high level element will be notified appropriately.
2.       All levels of the visual tree can execute code in response to events of their descendants, without expecting the descendant to notify them when the event fires.  

Handling WPF Control Events
Steps #1
Steps #2


public class Button : ButtonBase
{
// The routed event
public static readonly RoutedEvent ClickEvent;
static Button()
{
// Register the event
Button.ClickEvent = EventManager.RegisterRoutedEvent("Click",RoutingStrategy.Bubble, typeof(RoutedEventHandler), typeof(Button));
}
// A .NET event wrapper (optional)
public event RoutedEventHandler Click
{
add { AddHandler(Button.ClickEvent, value); }
remove { RemoveHandler(Button.ClickEvent, value); }
}

}
}